What are these Durable Functions?

Lately in the Azure Functions world, there has been a lot of hype around Durable Functions. Well, what are they? Durable Functions enable us to write stateful processes in a serverless environment. That’s a big deal because normal Azure Functions have a time limit of about 10 minutes for execution times. Durable functions unlock a whole new world of possibilities to move jobs requiring hours, days, or even weeks to the cloud while still only paying for execution time. For real? YES, for real.

Another key concept to get across with Durable Functions, is they are really orchestrator functions. At first, this concept didn’t immediately “click” in my head; with the name “durable” I was thinking their only use was for one long running function. This is not the case! Durable functions can be used to chain together a number of Azure Functions to be executed sequentially, handling everything from when human interaction is required, to making async HTTP API calls, and allows monitoring and executing the functions in parallel, waiting for the combined result.

A few use cases I can think of:

  • You have one Function that does some sort of data collection upfront (site scrapping, CSV, etc). Instead of having to put this data in to some temporary storage (blog, queue, table, etc) we can just pass this data to another Azure Function to do the other data manipulation/processing. We can eliminate using some storage accounts.
  • An approval process which requires different approvals from various departments. An event triggers the durable function which can then wait for external events, in this case the approvals, to come in. These events can come in, in any order and the function won’t complete until it has all of the approvals (or disapprovals).
  • Image Processing. You can have multiple Azure Functions that resize the image, optimize it, tag it, change formats, etc. Each one of those steps can be its own isolated Function. Using a Durable Function allows us to pass the data from one Function to another without putting something in a temporary storage.

There are so many applications for Durable Functions to move many of your long running, chained, stateless processes.

Durable Functions are the orchestrators of your pipeline.

This also brings up some questions though, all of which I will answer!

What happens with deployments? For example, I have a Durable Function running in Production and it requires some sort of human interaction which could take a day to complete. What happens when I deploy new code 12 hours in? Will the old function stick around until all of it’s traffic has drained and been completed?

Can I run these locally like normal Azure Functions? Are there any caveats with the dev tools/set up?

How does the Function know how to pick up where it left off a day later? Surely there must be some data stored somewhere. Where is that place?

Is there still a normal cold start time when the Function picks back up where it left off?

Can I combine the orchestration triggers with other triggers such as HTTP, queue, blob, etc?

How will application insights report Durable Functions? ProcessIds, consumption times, logging?

If you can think of any other questions, please comment here and I will do my best to get you an answer/example!

Google Home Actions and Azure Functions

I’ve recently been having fun integrating home automation throughout my home. Currently I have a Google Home, and two Google Home Minis. Until now, I’ve just been asking simple questions, setting up reminders, turning lamps on and off, etc, but now I want to start creating custom Google Home Actions myself. The Actions I want to create are Actions that will store and update data in a data store so I can get it back out later with another Action, or build a user interface to view the data we’ve just stored.

In this post we’re going to build a simple Google Home Action that enables us to tell our Google Home who won a game, and what game they won and store this information in Azure.

Really all I need is an API endpoint and somewhere to keep the data. For this, I’ve chosen Azure Functions + Azure Table Storage. Azure Functions are extremely simple, lightweight, cheap ways to stand up an API endpoint, so we’re going to use them for this example.

First, I needed to understand how to even create a Google Home Action. I found the Actions Console, here and signed in with the same account I have linked to my Google Homes.

pic1

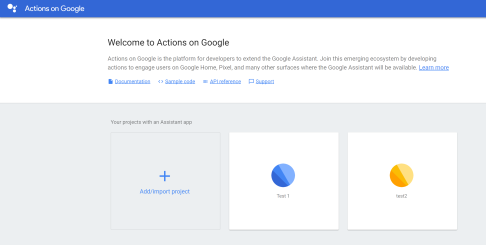
Next, we Add/import project, give it a name and create!

For this demo, we’re going to create a Dialogflow App. You can check out more of what a Dialogflow app consists of here. Essentially, Dialogflow apps are a more conversational type of Action where you can ask questions or give commands.

pic2

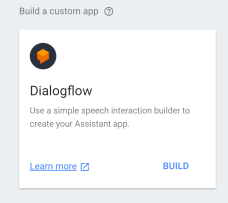
After you click Build you’re going to want to select Create Actions on Dialogflow.

pic3

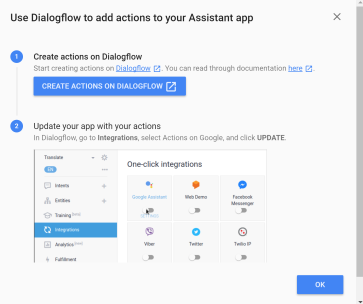
This will take you to Dialogflow, which used to be API.AI, but renamed after Google purchased it. Here is where you will design how the conversation will flow, and where you will hook it up to our Azure Function.

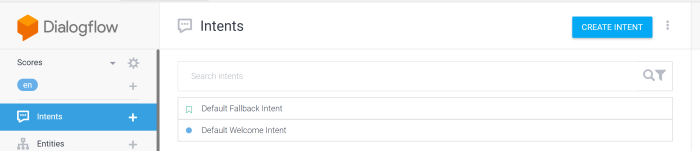
Create a Dialogflow project, and begin creating something called an Intent.

pic4

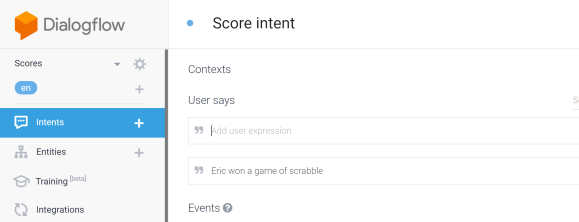
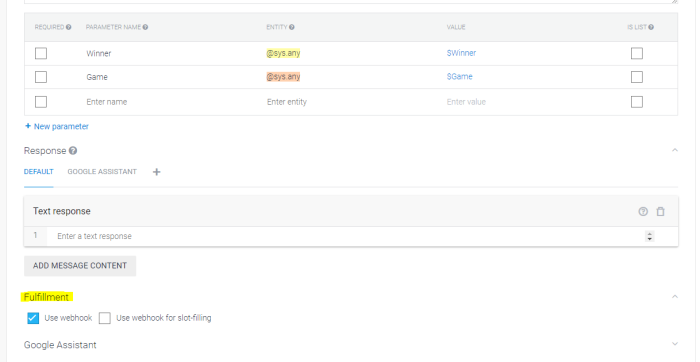
For this Action, I want to keep track of who won a game and the date in which we played it. So, for an expression if I say Eric won a game of Scrabble, I want to add an entry to our Azure storage. To do this we type that example above in to the Contexts section.

pic5

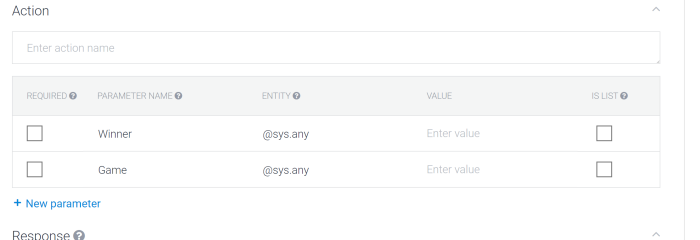
Now we need to create some parameters to pull out of our expression. In our case, we need two parameters; Winner and Game. Be sure to set the Entity to @sys.any.

pic6

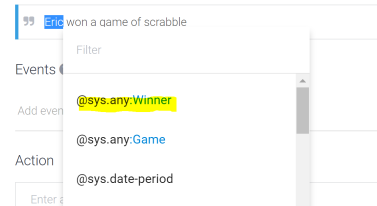
Once we have the parameters created we can actually use this interface to assign words or segments, from the expression we created, to these parameters to be passed in the request payload. Simply highlight the word and it will bring up a dialog for you to be able to select one of the parameters you want to set it to. Do this for both Winner and Game.

pic7

These parameters are what will be sent in the parameters object of the request, which I’ll describe below.

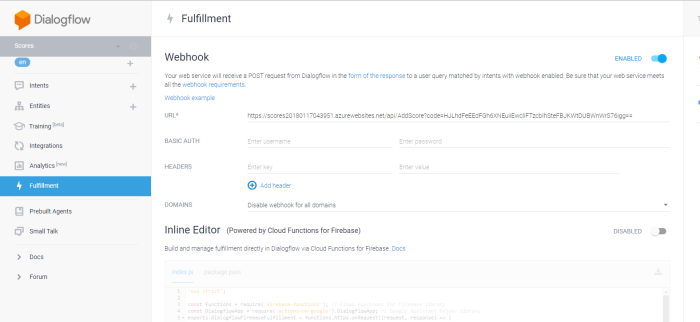
Great, we have the parameters we need for the request….but how do we actually call our Azure Function? Well we need to set up two more items, Fulfillment and Integrations. For Fulfillment, click on the Fulfillment menu option in Dialogflow. In here, we need to Enable the Webhook option and provide the URL. In this instance our webhook URL is going to be the URL of our Azure Function. After you’ve enabled the webhooks and added the Azure Function URL make sure you click Save!

pic8

Once you’ve enabled the Webhook/Fulfillment, we need to go back in to our Intent. You’ll now notice a Fulfillment option that you can expand and can use to enable the webhook for this intent.

pic9

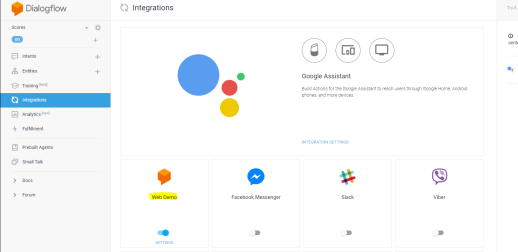
Finally, we need to enable the Web Demo integration in the Integrations tab in Dialogflow. When we do this, it gives us the ability to test this in a web application which is very useful.

pic10

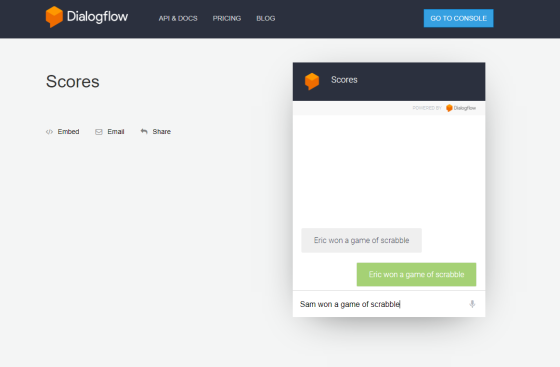
In the web application, we can type a command and it will send it to our Webhook, which is our Azure Function! We can type commands, questions, etc and get responses back.

pic11

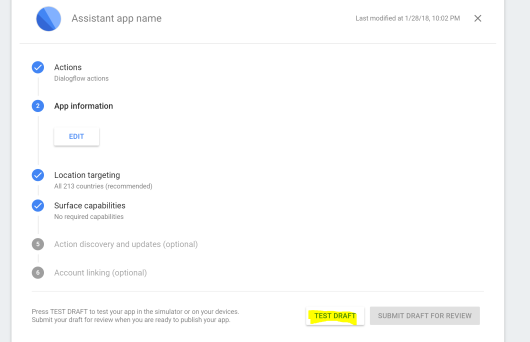
Even cooler, we can actually test this with our Google Home! In order to do this, you can go to the Actions console, select our Action, and click Test Draft.

pic12

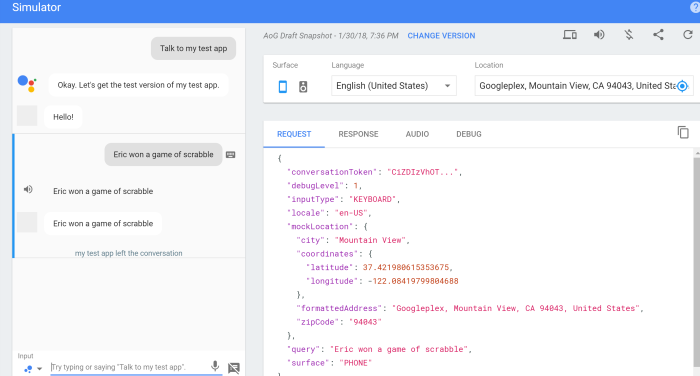
Doing this will bring up a simulator. Here you can talk to your test app by typing commands in like the screenshot below, or you can actually talk to your Google Home (which will be in a demo on Function Junction soon!).

pic13

In order to use you Google Home, you can just say:
“Hey, Google Talk to my test app”
The Google Home will reply with whatever you’ve set your initial response to be.
Then you can say: “{Your-name} won a game of {game}”
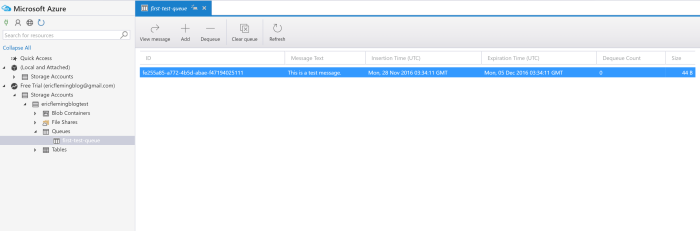
You’ll then see it show up in your Azure Data store!

A quick note, your Google Home has to be hooked up to the same account that you’re creating your Google Home Actions with in order to test in this manner. I’ll be sure to post the Function Junction episode here after we’ve recorded it.

Oh yea, the Azure Function!

We’ve spent so much time about setting up the Action, I almost forgot to show you my simple Azure Function for all of this! First of all, it helps to know what the format of the request looks like – this took me a few minutes to find. The entire Dialogflow webhook format can be found here. For this example, we really only care about the parameters object. I created some POCO objects for my Azure Function to use.

    public class GoogleHomeRequest
    {
        public GoogleHomeResult Result { get; set; }
    }

    public class GoogleHomeResult
    {
        public GoogleHomeParameters Parameters { get; set; }
    }

    public class GoogleHomeParameters
    {
        public string Winner { get; set; }
        public string Game { get; set; }
    }

We’ll then be able to deserialize the incoming request and use the parameters in the code.

I’m using Azure Table Storage in this Function, but you can use any type of Azure Data storage you’d like! The attribute bindings make wiring up the different types of storage really simple.

Now, we have the parameters from the Action’s request and we’ve put some logic around them to check if they exist and if they do, we add a record to Azure Table Storage. But we need to send a response back to the Action. The action needs three items:

Speech – What the Google Home will say back to you
DisplayText
– What a device will display back to you
Source
– This will be set to webhook for this example

The response object will then look like this:

public class Response
{
    public string Speech { get; set; }
    public string DisplayText { get; set; }
    public string Source { get; set; }
}

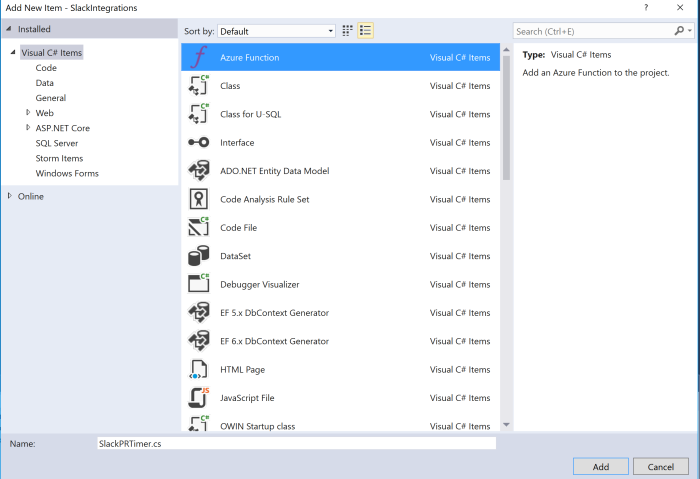
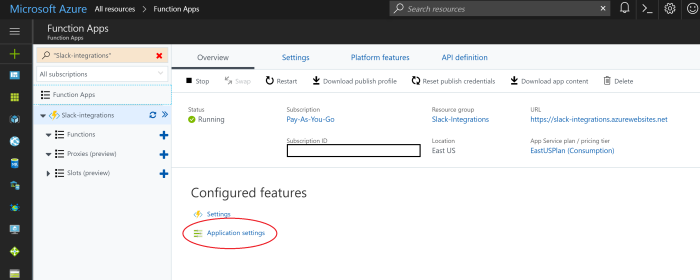
Here’s my full Azure Function! If you’re not too familiar with Azure Functions, make sure you set up your TableConnection in your Azure Function app settings when you deploy it. If you need help with deploying it, you can also check out some more Function Junction episodes on YouTube!

using System;
using System.Net;
using System.Net.Http;
using System.Threading.Tasks;
using Microsoft.Azure.WebJobs;
using Microsoft.Azure.WebJobs.Extensions.Http;
using Microsoft.Azure.WebJobs.Host;
using Microsoft.WindowsAzure.Storage.Table;

namespace Scores
{
    public static class AddScore
    {
        [FunctionName("AddScore")]
        public static async Task<HttpResponseMessage> Run(
            [HttpTrigger(AuthorizationLevel.Function, "get", Route = null)]HttpRequestMessage req,
            [Table("Games", Connection = "TableConnection")]ICollector<GameStat> gameStat,
            TraceWriter log)
        {
            log.Info("C# HTTP trigger function processed a request.");

            var googleHomeRequest = await req.Content.ReadAsAsync<GoogleHomeRequest>();
            var googleHomeParameters = googleHomeRequest.Result.Parameters;

            var response = new Response();
            if (!string.IsNullOrEmpty(googleHomeParameters.Winner) && !string.IsNullOrEmpty(googleHomeParameters.Game))
            {
                var now = DateTime.Now.ToLocalTime();
                var newStat = new GameStat
                {
                    GameName = googleHomeParameters.Game,
                    Winner = googleHomeParameters.Winner,
                    Date = DateTime.Now.ToLocalTime(),
                    PartitionKey = googleHomeParameters.Winner,
                    RowKey = googleHomeParameters.Game + Guid.NewGuid().ToString()
                };

                gameStat.Add(newStat);
                response.DisplayText = $"{googleHomeParameters.Winner} won a game of {googleHomeParameters.Game}";
                response.Source = "webhook";
                response.Speech = $"{googleHomeParameters.Winner} won a game of {googleHomeParameters.Game}";
            }

            return req.CreateResponse(HttpStatusCode.OK, response);
        }
    }

    public class GoogleHomeRequest
    {
        public GoogleHomeResult Result { get; set; }
    }

    public class GoogleHomeResult
    {
        public GoogleHomeParameters Parameters { get; set; }
    }

    public class GoogleHomeParameters
    {
        public string Winner { get; set; }
        public string Game { get; set; }
    }

    public class Response
    {
        public string Speech { get; set; }
        public string DisplayText { get; set; }
        public string Source { get; set; }
    }

    public class GameStat : TableEntity
    {
        public string GameName { get; set; }
        public string Winner { get; set; }
        public DateTime Date { get; set; }
    }
}

Using Azure Functions to Build A Slack Integration – ‘File new’ -> Live!

Azure Function to Slack Integration Webhook

A Slack Integration, in my opinion, is a perfect use case for an Azure Function. Why stand up an entire web site to run simple requests? With Azure Functions you can write the code, deploy it to your resource group in Azure and ….. that’s it! Sounds good right? Let’s take a look at how we get there from “File New -> Project” in Visual Studio, to having your Slack Integration running live in “Production” in hardly any time at all.

For this Slack Integration, we will create an Azure Function which uses a Timer Trigger and executes on a pre-defined schedule. When it executes it will check if there are any open pull requests in a repository in VSTS, and if there are, post a message to a specific Slack channel.

File New -> Azure Function Project

I’m using the Azure Function Tooling for Visual Studio 2017 to develop new Functions. These tools can be downloaded here.
First, we will create the Azure Functions project.
NewFunctionProject
Then, add a new Function and choose the Timer Trigger.
SlackPRTimer

You’ll notice in the template you can set the schedule on creation in the Schedule textbox. If you already know how to do this, go ahead and set it to what you think you may want, but this is something easily updated at any time in the function itself. Also, if the scheduling syntax isn’t very familiar to you, there are some good docs on it here to help you out.

Write the Code!

We have our shell of a Timer Triggered Azure Function now, so let’s add the code for the Slack Integration described above. I won’t go in to the details about the code itself, but I do want to point out a few things in regards to Settings and running locally. Below is a link to a gist of the Function I created for your convenience, maybe to have open on another tab or screen so you don’t have to flip back and forth?


using System;
using Microsoft.Azure.WebJobs;
using Microsoft.Azure.WebJobs.Host;
using System.Net.Http;
using Newtonsoft.Json;
using System.Threading.Tasks;
using System.Net.Http.Headers;
using System.Linq;
using SlackIntegrations.Models;
namespace SlackIntegrations
{
public static class VSTSPRs
{
private static string SlackUrlSecret = Environment.GetEnvironmentVariable("SlackUrl");
private static string RepositoryId = Environment.GetEnvironmentVariable("RepositoryId");
private static string PersonalAccessToken = Environment.GetEnvironmentVariable("PersonalAccessToken");
private static string Username = Environment.GetEnvironmentVariable("VSUsername");
private static string VSTSUrl = $"https://efleming.visualstudio.com/DefaultCollection/_apis/git/repositories/{RepositoryId}/pullRequests?api-version=3.0";
private static string SlackUrl = $"https://hooks.slack.com/services/{SlackUrlSecret}";
[FunctionName("SlackPRTimer")]
public static async Task RunAsync([TimerTrigger("0 0 9-17 * * 1-5")]TimerInfo myTimer, TraceWriter log)
{
log.Info("Calling VSTS to see if there are any open Pull Requests");
try
{
var pullRequests = GetAllPullRequests();
if (pullRequests != null)
await PostToSlack(pullRequests.Result);
}
catch (Exception ex)
{
log.Error($"An exception was thrown – Ex: {ex.Message}");
}
}
private static async Task<Result> GetAllPullRequests()
{
Result result = null;
using (HttpClient client = new HttpClient())
{
client.DefaultRequestHeaders.Accept.Add(
new MediaTypeWithQualityHeaderValue("application/json"));
client.DefaultRequestHeaders.Authorization = new AuthenticationHeaderValue("Basic",
Convert.ToBase64String(
System.Text.Encoding.ASCII.GetBytes(
string.Format("{0}:{1}", Username, PersonalAccessToken))));
using (HttpResponseMessage response = client.GetAsync(VSTSUrl).Result)
{
response.EnsureSuccessStatusCode();
string responseBody = await response.Content.ReadAsStringAsync();
result = JsonConvert.DeserializeObject<Result>(responseBody);
return result;
}
}
}
private static async Task PostToSlack(Result result)
{
using (HttpClient newClient = new HttpClient())
{
var slackRequestText = $"You have {result.Count} Pull Requests Open in the {result.Value.FirstOrDefault().Repository.Project.Name} Project";
var json = JsonConvert.SerializeObject(new { text = slackRequestText });
var resultOfSlack = await newClient.PostAsJsonAsync(SlackUrl, new { text = slackRequestText });
resultOfSlack.EnsureSuccessStatusCode();
}
}
}
}

To make the code a little cleaner, I pulled out all of the models in to a Models folder at the root of the project. Even though we are working with an Azure Function doesn’t mean we can’t still apply the same practices and structuring as we normally would! Here is the gist for the models.


using System.Collections.Generic;
namespace SlackIntegrations.Models
{
public class Result
{
public IEnumerable<PullRequest> Value { get; set; }
public int Count { get; set; }
}
public class PullRequest
{
public Repository Repository { get; set; }
public CreatedBy CreatedBy { get; set; }
public string Title { get; set; }
}
public class Repository
{
public Project Project { get; set; }
}
public class Project
{
public string Name { get; set; }
}
public class CreatedBy
{
public string DisplayName { get; set; }
}
}

view raw

VSTS Models

hosted with ❤ by GitHub

Handling Settings Locally

You’ll notice I declare some variables at the top of the class. Locally these variables are being pulled from local.settings.json. This is what our file will look like

{
"IsEncrypted": false,
"Values": {
"AzureWebJobsStorage": "UseDevelopmentStorage=true",
"AzureWebJobsDashboard": "",
"SlackUrl": "slack-url/provided-by/slack-integration-ui",
"RepositoryId": "repository-guid-id-in-vsts",
"PersonalAccessToken": "person-access-token-from-vsts",
"VSUsername": "vsts-username"
}
}

Once you have the settings all defined locally (I just used my production creds while getting it to work locally first), you can actually run/debug this Azure Function through Visual Studio.

NOTE: When you run Timer Triggers locally you’ll need to have the Storage Emulator running. You can find it here under the “Azure Storage Emulator” section.

Running the project locally will set up your schedule automatically, and when the first occurrence in the schedule appears, the function will be executed and you can see it work.

While testing, I set the schedule down to trigger every minute. To do this, update that TimerTrigger attribute to be the following:

[TimerTrigger(“0 */1 * * * *”)]

This is something you could also put as an Application Settings, you could have it set to trigger every minute locally but only trigger on a “9-5 M-F” schedule in Production.

That’s all well and good locally, but how do we set those settings up when we deploy this out to our Azure Resource?

NOTE: I’ve put some potentially helpful information about getting the values you need and enabling a custom integration in Slack, below.

Handling Application Setting for “Production”

This may be your first time setting up an Azure Function, so I’ll quickly show you how to set up the Function App / Azure Resource.

Start by just searching for the “Function App” in the Azure Portal

CreateFunctionAppInAzure
Select it and create a new one
NewFunctionAppValues

Select the Function App you just created, and select the *Application Settings* option
ApplicationSettingsForFunctionApps

Then just add each setting you need to add
AddSettings

Now, when you deploy the function to that resource group your settings will get picked up and replaced in the function!

Slack Integration Setup

To enable Slack Integrations, go here.
https://your-slack-domain.slack.com/apps/manage/custom-integrations

Once there, you’ll need to enable a custom Incoming WebHookIncomingWebHook

Here is where you will find the WebHook URL, which is the equivalent to our SlackUrl above. You’ll also set which channel the post from the Azure Function will happen in.
WebHookVals

Deploy the Azure Function using VSTS

Since we’re Microsoft-ing out here, we might as well be using VSTS for hosting our repo as well as our deployment pipeline.
There is already a GREAT, simple article on how to do this here.

The only note I will make about it is to make sure you’ve created the Azure Resource above before doing this step. I had not the first time…and it bit me.
Once you’ve followed the directions in that link, you should be able to see the Function created in your Azure Resource!

And…..

YOU’RE LIVE!

You now have a Slack Integration backed by an Azure Function running in Azure on the schedule you defined. Easy.

PLEASE if there are any questions, or I did not explain something clearly, please please please reach out to me and comment below. I’d love to edit the post to make something more clear.

Enable CORS when running Azure Functions Project Locally

We can run Azure Functions locally during development now with the Azure Functions tooling in the latest version of Visual Studio 2017. In order to call these functions from another project, I needed to enable CORS which took me a minute to figure out. There may be a better way of doing this to come, but this did the trick for right now.

  • Go to the Properties of your Azure Functions project (Right click the project -> Properties)
  • Click on the Debug tab
  • Add the following to the Application arguments section:

EnableCORSAzureFunctions

You can also add this to your current profile in the launchSettings.json file.

{
"profiles": {
"Functions": {
"commandName": "Project",
"commandLineArgs": "host start --cors http://localhost:1909"
}
}
}

This did the trick for me..for now! Hopefully it helps you too.

Getting Started with .NET Core and Azure Queue Storage

I’ve recently written a post on Getting Started with Azure Queue Storage, so I thought I would expand on this and show you how to do the same with in a .NET Core project since there a certainly some differences.

Set Up

Before interacting with any of Azure’s storage capabilities you’ll need to create an Azure Storage Account. This will be the place where all of the Azure Storage Data objects are stored and be interacted with from the Azure Portal, Azure CLI, or Azure PowerShell.

For this walk-through, we will be using the Azure Storage Emulaor rather than the Azure Storage account in the cloud. You’ll also fine the Microsoft Azure Storage Explorer useful for both local and external development. The existence of the Azure Storage emulator is a big advantage for developers over AWS SQS where there is no ability to test locally.

(same as before!)

For this demo, I created two projects GroceryWeb, and Core. GroceryWeb is a ASP.NET Core Web Application (.NET Framework). The .NET Framework part is important here as the Azure NuGet packages are not yet updated for .NET Core.

The Core project is a Class Library (.NET Core) project, but we will need to update the project.json before we can use the Azure NuGet packages.When you first create the Core project, the project.json will look like so:

{
  "version": "1.0.0-*",

  "dependencies": {
    "NETStandard.Library": "1.6.0"
  },

  "frameworks": {
    "netstandard1.6": {
      "imports": "dnxcore50"
    }
  }
}

We’ll need to target the previous version of .NET Core to be the full framework version, so replace  the frameworks section with the following:

  "frameworks": {
     "net452": { }
  }

Creating a new Queue Storage

The first step in my previous article was to set up the connection strings, we will start there as well, but we are already going to differ because of the way things are done in .NET Core.

We first need to create an AzureStorageSettings class with a single property for now, ConnectionString.

namespace Core.Azure
{
    public class AzureStorageSettings
    {
        public string ConnectionString { get; set; }
    }
}

Then we need to set the ConnectionString to the value we have in our appsettings.json file, so we can leverage it via the Options pattern.
For this, I’ve created a Data section, with a subsection of Azure
The provided value for the ConnectionString can either be for local development, or development with your actual Azure Account. Here is what our appsettings.json file should look like:

{
  "Logging": {
    "IncludeScopes": false,
    "LogLevel": {
      "Default": "Debug",
      "System": "Information",
      "Microsoft": "Information"
      }
    },
    "Data": {
      "Azure": {
        "ConnectionString": "UseDevelopmentStorage=true"
      }
    }
}

Note: In this example, we are going to develop this locally, but if you wanted to interact with your actual Azure account your connection string would look something like this:

"Data": {
      "Azure": {
        "ConnectionString": "DefaultEndpointsProtocol=https;AccountName=your-azure-account-name;AccountKey=your-azure-account-key"
      }
    }

Now that we have these values in our appsettings.json file, we need to be able to use them elsewhere. In the ConfigureServices method of our Web project’s Startup class we need to enable our project to use the Options functionality followed by creating an AzureStorageSettings object to inject in other classes.

public void ConfigureServices(IServiceCollection services)
{
    // Add framework services.
    services.AddMvc();
    services.AddOptions();

    services.Configure<AzureStorageSettings>(Configuration.GetSection("Data:Azure"));
}

The code above will make it possible so you can inject an AzureStorageSettings object to other classes. For example, you can pass it in to the constructor of a controller in order to use it’s connection string:

public HomeController(IOptions<AzureStorageSettings> settings)
{
    CloudStorageAccount storageAccount = CloudStorageAccount.Parse(settings.Value.ConnectionString);
    _cloudQueueClient = storageAccount.CreateCloudQueueClient();
}

As you can see in the code above, we pass it the AzureStorageSettings object which has the ConnectionString populated. We wouldn’t typically want to do that type of setup in the constructor of the controller though, but we’ll get back to that shortly.

Before we move on, we of course need to make sure the queues we want to interact all exist when the application starts up. To do this, I created a BootstrapAzureQueues class, that loops through all of the known queues for my application and ensures they exists. If they do not exist, it will create them. Make sure you call this from your Startup.cs!

using Microsoft.WindowsAzure.Storage;
using Microsoft.WindowsAzure.Storage.Queue;

namespace Core.Azure
{
    public class BootstrapAzureQueues
    {
        public static void CreateKnownAzureQueues(string azureConnectionString)
        {
            CloudStorageAccount storageAccount = CloudStorageAccount.Parse(azureConnectionString);
            CloudQueueClient queueClient = storageAccount.CreateCloudQueueClient();

            foreach (var queueName in AzureQueues.KnownQueues)
            {
                queueClient.GetQueueReference(queueName).CreateIfNotExists();
            }
        }
    }
}

Now that we have all of our configuration settings in place, and all of our known queues have been created we can start to push messages to the queues.

In order to interact with the queues from something like a controller I’ve created a QueueResolver in my Core project to move the initial setup of connecting to our Azure Storage Account, creation of the Azure Queue Client, etc into one location.

using Microsoft.Extensions.Options;
using Microsoft.WindowsAzure.Storage;
using Microsoft.WindowsAzure.Storage.Queue;

namespace Core.Azure
{
    public class QueueResolver : IQueueResolver
    {
        private readonly CloudQueueClient _queueClient;
        public QueueResolver(IOptions<AzureStorageSettings> settings)
        {
            CloudStorageAccount storageAccount = CloudStorageAccount.Parse(settings.Value.ConnectionString);
            _queueClient = storageAccount.CreateCloudQueueClient();
        }

        public CloudQueue GetQueue(string queueName)
        {
            return _queueClient.GetQueueReference(queueName);
        }
    }

    public interface IQueueResolver
    {
        CloudQueue GetQueue(string queueName);
    }
}

With this, we just have to configure this service so we can leverage it via DI and can use it in our Controller. Our final ConfigureServices method in our Web’s Startup.cs turns out like this:

public void ConfigureServices(IServiceCollection services)
{
    services.AddMvc();
    services.AddOptions();

    services.Configure<AzureStorageSettings>(Configuration.GetSection("Data:Azure"));
    BootstrapAzureQueues.CreateKnownAzureQueues(Configuration["Data:Azure:ConnectionString"]);

    services.AddTransient<IQueueResolver, QueueResolver>();
}

Now our controller doesn’t need to take in an AzureStorageSettings object but rather it can take in a QueueResolver.

private readonly IQueueResolver _queueResolver;
public HomeController(IQueueResolver queueResolver)
{
    _queueResolver = queueResolver;
}

Now, we can use the QueueResolver to get a reference to the queue we want by just passing in the queue name. Once we have the reference, we can interact all we want with the queue.

using Core.Azure;
using GroceryWeb.Models;
using Microsoft.AspNetCore.Mvc;
using Microsoft.WindowsAzure.Storage.Queue;

namespace GroceryWeb.Controllers
{
    public class HomeController : Controller
    {
        private readonly IQueueResolver _queueResolver;
        public HomeController(IQueueResolver queueResolver)
        {
            _queueResolver = queueResolver;
        }

        public IActionResult AddMessage(AzureMessage message)
        {
            var groceryListQueue = _queueResolver.GetQueue(AzureQueues.GroceryList);
            groceryListQueue.AddMessage(new CloudQueueMessage(message.AzureMessageText));
            return View("Index");
        }

        public IActionResult Index()
        {
            return View();
        }
    }
}

From the full Controller above, the AddMessage action will push a message to the GroceryList queue. For your convenience this the Index.cshtml view I ended with for this example along with the AzureMessage model.

Index.cshtml

@using GroceryWeb.Models
@model AzureMessage
<div class="row">
<h2>Application uses</h2>
<form asp-controller="Home" asp-action="AddMessage" method="post">
        Text for Message:  <input asp-for="AzureMessageText" /> 

        <button type="submit">Send Message</button>
    </form></div>

AzureMessage.cs

namespace GroceryWeb.Models
{
    public class AzureMessage
    {
        public string AzureMessageText { get; set; }
    }
}

There you have it! You’re all set up to interact with Azure Queue Storage in .NET Core!

Getting Started with Azure Queue Storage

It is common to want to be able to use messages, or message queues in your system’s architecture. I’m actively using a queueing system in my day-to-day work, called NServiceBus, which uses the local computer for it’s transport whether that be MSMQ, SQL Transport, or others that NServiceBus supports. I’ve recently come across a scenario where a service outside of my control needed access to the queue. This is where Azure Queue Storage comes in to play.

Azure Queue Storage can be accessed anywhere via authenticated http, or https requests. In these queues, you can store millions of messages to be consumed by some process that runs in your code base to read from the queue, an Azure web role, or an Azure worker role.

Set Up

Before interacting with any of Azure’s storage capabilities you’ll need to create an Azure Storage Account. This will be the place where all of the Azure Storage Data objects are stored and be interacted with from the Azure Portal, Azure CLI, or Azure PowerShell.

For this walk-through, we will be using the Azure Storage account in the cloud rather than the Azure storage emulator. I will be writing another article on using the Azure Storage emulator, but for now you can find information on it here. The existence of the Azure Storage emulator is a big advantage for developers over AWS SQS where there is no ability to test locally.

Creating a new Queue Storage

The first step in being able to programmatically create a new queue, is to set up the connection string for being able to communicate with your Azure Storage account. This can be accomplished by adding the following line to the appSettings section of your App/Web.config file.

<add key="AzureConnectionString" value="DefaultEndpointsProtocol=https;AccountName=your-account-name;AccountKey=your-account-key" />

You should know your AccountName, but you’ll need to get your AccountKey from the Azure Portal. In order to find this, Select your Azure Storage account and then go to Access Keys. Here you will see key1 and key2 which can be used for your connection string.

After the connection string is in place, you can get to work! You’ll need to install the following two NuGet packages to your project.

  1. WindowsAzure.Storage – which will also pull in the following dependencies.

windowsazurestoragedependencies

2. Microsoft.WindowsAzure.ConfigurationManager

Now, the first bit of code, will be to read your connection string in order to connect to your Storage Account.

CloudStorageAccount storageAccount = CloudStorageAccount.Parse(CloudConfigurationManager.GetSetting("AzureConnectionString"));

We can then create the Azure CloudQueueClient from the CloudStorageAccount we just created. This CloudQueueClient is what we will use to interact with our Queue Storage queues.

CloudQueueClient queueClient = storageAccount.CreateCloudQueueClient();

Now that we have the client, we can create the queue. You’ll notice first, we call the GetQueueReference method which will get information about a queue from your Azure Storage Account. It will contain information such as whether or not the queue exists which is used in the next line where we call CreateIfNotExists. This will do exactly as the method says, if the queue does not exist, it will be created; if it does, the command to create the queue will not be executed.

//Get back relevant information about the queue
_queue = queueClient.GetQueueReference("first-test-queue");

//Create the queue if it does not exist
_queue.CreateIfNotExists();

Push A Message To The Queue

Now that we have the queue created, we can push messages to it!

_queue.AddMessage(new CloudQueueMessage("This is a test message."));

The code above will push a message to the queue we created with the content of “This is a test message.”. There is no way to view the contents of the queue we created through the Azure Portal. For this, we can use a third party tool called Microsoft Azure Storage Explorer which can be found here.

mase

There you have it, you’ve just pushed a message to your Azure Queue!

For your reference, here is the code I used to quickly test this.
Note: This is not typically how you would want to set this up. You would move the queue creation and set up to the Startup of the project and inject some sort of settings and/or queue objects using DI, which I’d recommend Autofac to help you out there.


using System.Net;
using System.Web.Http;
using Microsoft.Azure;
using Microsoft.WindowsAzure.Storage;
using Microsoft.WindowsAzure.Storage.Queue;

namespace AzureWeb.Controllers
{
    [RoutePrefix("azure")]
    public class QueueStorageController : ApiController
    {
        private readonly CloudQueue _queue;
        public QueueStorageController()
        {
            CloudStorageAccount storageAccount = CloudStorageAccount.Parse(CloudConfigurationManager.GetSetting("AzureConnectionString"));
            CloudQueueClient queueClient = storageAccount.CreateCloudQueueClient();

            _queue = queueClient.GetQueueReference("first-test-queue");

            _queue.CreateIfNotExists();
        }

        [Route("push-message")]
        public IHttpActionResult SendMessageToQueue()
        {
            _queue.AddMessage(new CloudQueueMessage("This is a test message."));

            return StatusCode(HttpStatusCode.Accepted);
        }
    }
}


Creating and Sending a Simple Message to an SQS Queue

I’ll preface this article by talking a bit about the set up. You’ll first have to have created an AWS Account, you can set one up for free, but you’ll have to enter your credit card information. Once you have the AWS account set up, you’ll need to create an AWS Profile and set it as the default profile for your computer. After you’ve set the default profile for your system, add the following line to the appSettings section of the App/Web.config file for the project you plan on using for this.

<add key="AWSProfileName" value="Your-AWS-Profile-Name" />

Creating the Queue

Before I talk about creating an SQS queue programmatically I should say this is possible through the AWS Console UI. It is pretty straight forward, so for the scope of this article I will leave out those details, but I encourage you to check it out. The first step in creating an SQS queue programmatically is creating an AmazonSQSConfig. For this config, you’ll need to set ServiceURL and a Region, which specifies the region in which your AWS account resides.

//Set up the config
var awsConfig = new AmazonSQSConfig();
awsConfig.ServiceURL = "http://sqs.us-west-2.amazonaws.com";
awsConfig.RegionEndpoint = RegionEndpoint.USWest2;

Note: When creating an SQS queue from the SDK, the default region will be set to US East, but the AWS Console will default to US West. Be sure to specify which Region you want to use when creating an SQS queue whether it is through code, or through the AWS Console.

Once we’ve created the config, we can now use it to create the AmazonSQSClient. This client will be used for all of our commands going forward such as creating the queue, pushing items to the queue, reading from the queue, etc.

//Create the SQS Client
var _sqlClient = new AmazonSQSClient(awsConfig);

Now that we have our SQS Client set up, we can create our SQS queue. The CreateQueue method accepts a queue name as a parameter.

_sqlClient.CreateQueue("TestSqsQueue")

Creating the queue is great, but you’ll need to have the QueueUrl handy for subsequent requests that interact with that specific queue. The CreateQueue call can return this Url for you, so what I would recommend doing is the following.

var _testSqsQueueUrl = _sqlClient.CreateQueue("TestSqsQueue").QueueUrl;

Creating a queue this way, will create the queue but with all the defaults of an SQS queue. If you want to set specific attributes on an SQS queue you’ll need to either modify the existing queue through the AWS Management Console or use the SetQueueAttributes method, which I can further explain in another article.

queuecreated

Pushing A Message To The Queue

Now that we have our queue created, we can start to push messages to it.
The first thing we need to do, is create a new SendMessageRequest. This request will accept the queue url, from the response above, as well as the body of the message.

SendMessageRequest message = new SendMessageRequest(_testSqsQueueUrl, "Hello, reader");

Now, all that is left is to push the message to the queue using the SQS client.

_sqlClient.SendMessage(message);

There you have it! You’ve created your first SQS Queue and push a message to it.

messageinqueue

Code

For this quick example, I spun up a simple Api Controller and used PostMan to make the requests. For your convenience here is the controller.

using System.Net;
using System.Web.Http;
using Amazon;
using Amazon.SQS;
using Amazon.SQS.Model;

namespace Api.Controllers
{
  [RoutePrefix("sqs")]
  public class SqsController : ApiController
  {
      private readonly AmazonSQSClient _sqlClient;
      private readonly string _testSqsQueueUrl;
      public SqsController()
      {
          //Set up the config
          var awsConfig = new AmazonSQSConfig();
          awsConfig.ServiceURL = "http://sqs.us-west-2.amazonaws.com";
          awsConfig.RegionEndpoint = RegionEndpoint.USWest2;
          //Create the SQS Client
          _sqlClient = new AmazonSQSClient(awsConfig);

          //Create the Queue, and store the QueueUrl for future use
          _testSqsQueueUrl = _sqlClient.CreateQueue("TestSqsQueue").QueueUrl;
      }

      [Route("{name}")]
      public IHttpActionResult PostToQueue(string name)
      {
          //Create the message to send
          SendMessageRequest message = new SendMessageRequest(_testSqsQueueUrl, "Hello, reader");

          //Send the message
          _sqlClient.SendMessage(message);

          return StatusCode(HttpStatusCode.Accepted);
      }
   }
}

Handling Context Parameters in custom Web Test Request Plug-In

I previously wrote a post giving a very simple version of a Request Plug-in that would allow you to send raw JSON data in your Web Request. This plug-in works great for simple cases, but I quickly discovered this plug-in wasn’t going to handle all of my use cases. The original plug-in only accepts a string literal, meaning there will be no detection or replacing of any context parameter values in the string. Below, I’ve modified the original plug-in to find, and replace any context parameters that may be in the pasted JSON string.

Note: I want to leave this note at the top to ensure you don’t miss it. Make sure to uglify your JSON before pasting it into Visual Studio. Yes, I found this to be awesome. Even stripping all format when pasting into the Visual Studio modal didn’t work. The modal does not handle newlines very well. So, a bit of advice would be to just google “Uglify JSON”, copy/paste the result, and then paste into Visual Studio.


using System.Collections.Generic;
using System.ComponentModel;
using System.Linq;
using System.Text.RegularExpressions;
using Microsoft.VisualStudio.TestTools.WebTesting;

namespace SmokeTests.RequestPlugins
{
    [DisplayName("Add JSON content to Body")]
    [Description("HEY! Tip! Uglify your JSON before pasting.")]
    public class AddJsonContentToBody : WebTestRequestPlugin
    {
        [Description("Assigns the HTTP Body payload to the content provided and sets the content type to application/json")]
        public string JsonContent { get; set; }
        public override void PreRequest(object sender, PreRequestEventArgs e)
        {
            var pattern = "\\{\\{(.*?)\\}\\}";
            var regex = new Regex(pattern);
            var matches = regex.Matches(JsonContent);
            var listOfMatchedValues = CreateListOfMatchedValues(matches);

            if (listOfMatchedValues.Count > 0)
            {
                ReplaceContextParametersJsonContent(JsonContent, listOfMatchedValues, e);
            }
            else
            {
                e.Request.Body = CreateStringHttpBody(JsonContent);
            }
        }

        private List<Group> CreateListOfMatchedValues(MatchCollection matches)
        {
            var listOfMatches = new List<Group>();
            if (matches != null)
            {
                foreach (Match match in matches)
                {
                    listOfMatches.Add(match.Groups[1]);
                }
                return listOfMatches;
            }
            return listOfMatches;
        }

        private void ReplaceContextParametersJsonContent(string JsonContent, List<Group> listOfMatchedValue, PreRequestEventArgs e)
        {
            var newContent = JsonContent;
            var webContextParameters = e.WebTest.Context;

            foreach (var value in listOfMatchedValue)
            {
                var stringValueFromMatch = value.Value;
                var matchingContextParameter = webContextParameters.SingleOrDefault(x => x.Key == stringValueFromMatch);
                var valueOfContextParameter = matchingContextParameter.Value.ToString();
                newContent = newContent.Replace("{{" + stringValueFromMatch + "}}", valueOfContextParameter);
            }

            e.Request.Body = CreateStringHttpBody(newContent);

        }

        private StringHttpBody CreateStringHttpBody(string bodyContent)
        {
            var stringBody = new StringHttpBody();
            stringBody.BodyString = bodyContent;
            stringBody.ContentType = "application/json";

            return stringBody;
        }
    }
}

Hopefully you find this Request Plug-in to be as helpful as I did! Leave me a comment if you have a better way of doing this, or have any other ideas for another Request Plug-In.

Helpful Custom Request-Plugins for Web Tests

Here are a few Custom Request Plug-ins, that I created in order to help send custom requests that fit my needs. Custom Request Plug-ins will inherit from the base class WebTestRequestPlugin.

The first plug-in is one which will allow you to send your request as raw JSON. Most of the time when sending a request with a payload, it is in the form of JSON rather than using Form Post Parameters already built in in the Web Test Editor.


using System.ComponentModel;
using Microsoft.VisualStudio.TestTools.WebTesting;

namespace WebTests.RequestPlugins
{
    [DisplayName("Add JSON content to Body")]
    [Description("HEY! Tip! Uglify your JSON before pasting.")]
    public class AddJsonContentToBody : WebTestRequestPlugin
    {
        [Description("Assigns the HTTP Body payload to the content provided and sets the content type to application/json")]
        public string JsonContent { get; set; }

        public override void PreRequest(object sender, PreRequestEventArgs e)
        {
            var stringBody = new StringHttpBody();
            stringBody.BodyString = JsonContent;
            stringBody.ContentType = "application/json";

            e.Request.Body = stringBody;
        }
    }
}

JSONBodyPlugin
One thing to note about this plug-in is that we override the PreRequest method, so the Body sent by the request is already overwritten with the new JSON String body we set in the Request in the Web Test.

Note: One awesome(?) thing I found out when trying to copy/paste some JSON into this plug-in was that Visual Studio does not handle new lines well. So, you’ll have to uglify your JSON if you want to paste it straight into the JsonContent section above.

The second plug-in I created allows us to set the Method Type in which we send the request as. In the Web Test Editor the only options we have to send the request as are POST and GET. Sometimes when sending a request in a WebApi project you may want to send it as something like a PATCH, or PUT. Now, this is possible to set the Method to something other than POST, or GET but you have to manually open up the Web Test in an XML editor and it just becomes a real hassle to maintain if you’re going to have numerous requests like this. If you have a custom plug-in, all you have to do is add the plug-in, and say what you want the Method type to be (assuming you want it to be something other than POST or GET).


using System.ComponentModel;
using Microsoft.VisualStudio.TestTools.WebTesting;

namespace WebTests.RequestPlugins
{
    [DisplayName("Set HTTP Method Type")]
    [Description("Sets the HTTP Method for your request. Only necessary when needing a method type other than POST or GET which are included in the UI for RequestUI namespace.")]
    public class SetHttpMethod : WebTestRequestPlugin
    {
        [Description("HTTP Method for your Request. For example: GET, POST, PATCH, PUT")]
        public string MethodType { get; set; }
        public override void PreRequest(object sender, PreRequestEventArgs e)
        {
            e.Request.Method = MethodType;
        }
    }
}

SetMethodTypePlugin
As you can tell from the code above, all you will need to do is enter your desired Method Type (PATCH, PUT, POST, GET, DELETE, etc..) in the UI when adding a custom Request Plug-in.

Hopefully I can update this article with new plug-ins as I create them!

Validate JSON Response in Web Tests

In doing more Web Performance and Load Testing of WebApi projects, I felt the need for a Custom Validation Rule that would validate a Response in JSON format.

using System.ComponentModel;
using Microsoft.VisualStudio.TestTools.WebTesting;
using Newtonsoft.Json.Linq;

namespace SmokeTests.ValidationRule
{
    [DisplayName("Validate JSON Response")]
    [Description("Will validate a JSON Response for an expected value. Note: In order to check nested object enter the parent first. For example, ParentOfChildYouWantToSelect.NestedChildElementYouWantToCheck")]
    public class ResponseJsonValidator : Microsoft.VisualStudio.TestTools.WebTesting.ValidationRule
    {
        public string TokenToCheck { get; set; }
        public string ExpectedTokenValue { get; set; }

        public override void Validate(object sender, ValidationEventArgs e)
        {
            var jsonString = e.Response.BodyString;

            if (string.IsNullOrEmpty(jsonString))
            {
                e.IsValid = false;
                e.Message = "No response";
            }
            else
            {
                if (TokenAndValueCheckedAreEqual(jsonString))
                {
                    e.IsValid = true;
                }
                else
                {
                    e.IsValid = false;
                    e.Message = "Expected and Actual values do not match.";
                }
             }
         }

         public bool TokenAndValueCheckedAreEqual(string jsonString)
         {
             JObject json = JObject.Parse(jsonString);
             JToken valueSelectedFromToken = json.SelectToken(TokenToCheck);
             return valueSelectedFromToken.Value<string>() == ExpectedTokenValue;
          }
      }
  }

This validation rule will ask you to fill in two parameters: TokenToCheck and ExpectedTokenValue.

TokenToCheck: The name of the node in the JSON response to check.

ExpectedTokenValue: The value expected for the token specified in the TokenToCheck parameter.

ValidationRuleDialog

You are also able to check nested elements by specifying the Parent element first, followed by the child you want to select. In the example below, if you want to validate the value for Child2, you will enter the following for the parameters.

TokenToCheck: Parent.Child2
ExpectedTokenValue: Child 2 Value

{
    "Parent":
    {
        "Child1": "Child 1 Value",
        "Child2": "Child 2 Value"
    }
}

Hopefully you find this useful! I’m sure the error messages could be updated, but I’ll leave it generic here for you to tweak to fit your needs! I also would recommend writing some Unit Tests to make sure this does what you want it to do. If you have questions on how to Unit Test this, leave me a comment and I’d be happy to walk you through it.